Implement Azure Storage Blobs and Files
Implement
Azure Storage Blobs and files
Azure blob storage is a storage
type of the azure Storage account. Go
through my previous post about Azure Storage Accounts here.
Azure blob storage is the place to store unstructured data of many varieties. You can
store images,
video files, word documents, lab results, and any other binary file you can
think of.In
addition, Azure uses blob storage extensively. For instance, when you mount
extra logical drives in
an Azure virtual machine (VM), the drive image is actually stored in by the
Blob service associated with an Azure blob storage account. In a blob storage
account, you can have many containers. Containers are similar to folders in
that you can use them to logically group your files.
You can also set security on the entire container. Each blob storage account
can store up to 500 terabytes of data.
All blobs
can be accessed through a URL format. It looks like this:
http://<storage account
name>.blob.core.windows.net/<container name>/<blob name>
Create Container
This section explains how to create a container and upload a file
to blob storage for later reading.
1. Navigate to the Containers tab for your
storage account in the management portal
Accessed
via https://manage.windowsazure.com.

2. Click Add on the command bar. If you do not yet have a container, you can click Create a container.
3. Give the container a
name, and select Public Blob for the access rule, as shown in below

4. You can choose between the following access permissions on the container:
■ Private All access to the container and its
blobs require authentication.
■ Public Container All access to the container and its blobs are anonymous.
■ Public Blob You cannot list blobs in the container without authentication, but you can navigate to the blob URL, if you have it, and read it anonymously. This setting can be changed at any time through the management portal, by using Windows PowerShell, or by configuring it programmatically.
Find your Account access key
To ind your account access key using the management
portal, complete the following steps:
1. Click
the Dashboard tab for your storage account.
2. Click Manage Keys to in the Key1 and Key2 key for managing your
account,
as shown below.
Always use the key1 for management activities.

To upload a
blob using AzCopy, complete the following steps:
1. Download
AZCopy from http://aka.ms/downloadazcopy.
Run the .msi ile downloaded from this link.
2. Open
a command prompt and navigate to C:\Program Files (x86)\Microsoft SDKs\Azure\AzCopy.
3. Create a text file in a folder that is easy to get to. Insert some
random text in it and saved in my local c:\test folder .
4. open cmd(command propmt ) , then enter below command.
AzCopy /Source:C:\test
/Dest:https://<storageAccountname>.blob.core.windows.net/<containerName> /DestKey:key /Pattern:"contacts.txt"

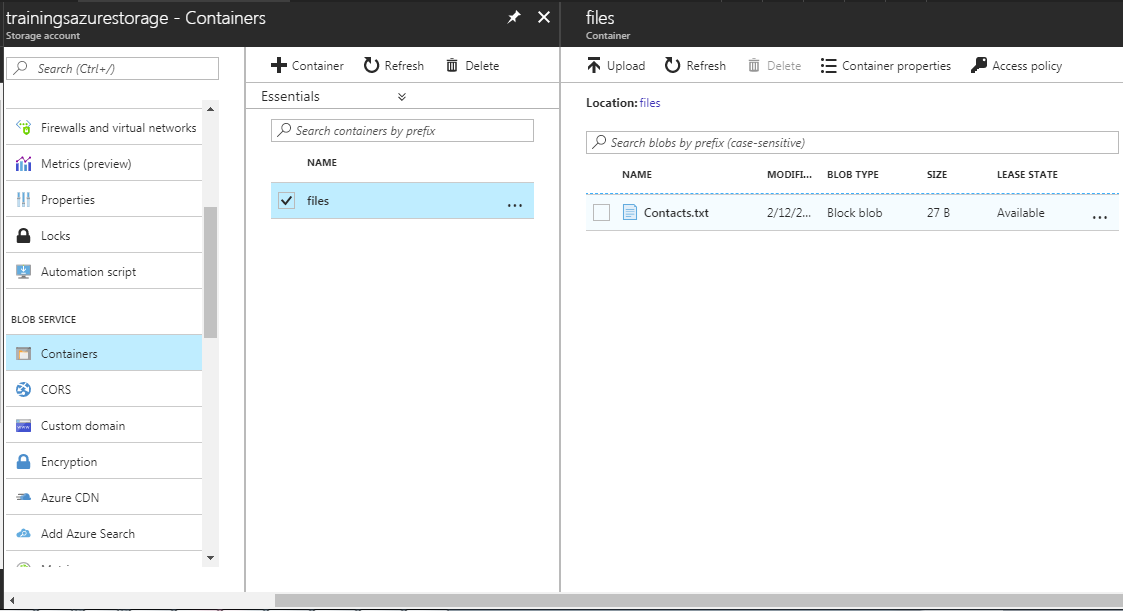
5. click on enter in the command prompt , file will transer to container in the Azure portal.
6. you should be able to see your in azure portal as shown in the below screen shot.
Reading data
You can
anonymously read blob storage content directly using a browser if public access
to blobs is
enabled. The URL to your blob content takes this format:
https://<your account
name>.blob.core.windows.net/<your container name>/<your path
and Filename>
https://<StorageAccount>.blob.core.windows.net/files/Contacts.txt

Comments
Post a Comment