Azure Storage Tables with Visual Studio 2017
Azure Storage Tables
Azure
Storage is a non-relational (NoSQL) entity storage service on Microsoft Azure.
When you create a storage account, it includes the Table service alongside the
Blob and Queue services. Table services can be accessed through a URL format.
It looks like this:
http://<storage account
name>.table.core.windows.net/<table name>.
There
are many forms of NoSQL databases:
■ Key-value stores that organize data with a unique key per record and often allow
for jagged entries where each row might not
have a complete set of values.
■ Document databases that are similar to key-value stores with
semi-structured, easy-to query documents. Usually,
information is stored in JavaScript Object Notation (JSON) format.
■ Columns stores that are used to organize large amounts of
distributed information.
■ Graph databases that do not use columns and rows; instead,
they use a graph model for storage and query,
usually for large amounts of highly distributed data.
Table
storage is a key-value store that uses a partition key to help with scale out
distribution of data and a row key
for unique access to a particular entry. Together, these keys are used to
uniquely identify a record in the account.
Creating a table
1. File Open ->Project Open visual studio 2017 and Create C# Console application as
shown below screen shot.
In your app.config file,
create a storage configuration string and entry, replacing AccountName (storage
account name and AccountKey with you storage account values or you should be able to write
connection string in the code as show below.
2. Use NuGet to obtain the
Microsoft.WindowsAzure.Storage.dll. Install below package from visual studio
2017, please follow below steps.
2.1 Right click on console project and select “Manage Nuget packages” as shown blow.
2.2. Search for windowsazure.Storage and click install.
2.3. Package is installed successfully to your project as shown below.
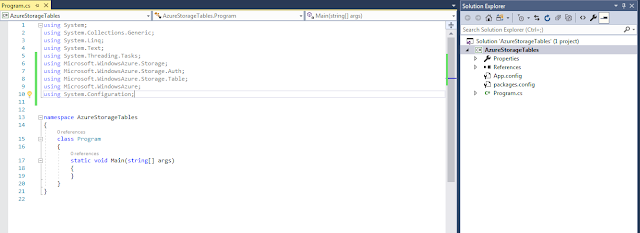
3. Add the following Windows Azure
reference to class using statements to the top of your Program.cs file:

4. Use the following command to create a table if one doesn’t already exist:
Inserting records
To
add entries to a table, you create objects based on the TableEntity base class
and serialize them into the table using the Storage Client Library. The
following properties are provided for you in this base class:
■ Partition Key Used to partition data across storage infrastructure
■ Row Key Unique identifier in a partition
■ Timestamp Time of last update maintained by Azure Storage
■ ETag used internally to provide optimistic concurrency
The combination of partition key and row key must be unique within
the table. This combination is used for load balancing and scaling, as well as
for querying and sorting entities.
1. Right click on solution and select addà new ItemàClass from templates.
2. Add a class called “OrderEntity” to your project,
and then add the following code to it:
3. Inherit OrderEntity
class from TableEntity and add
properties as shown below.
4. Add the following code to the console program to
insert a record:
5. Press f5 to run console app and new table “orders”
created under storage account as shown below.


Comments
Post a Comment